Sunday, June 25, 2023

Empty Nester Catastrophe - Send help

 Day two of being an empty nester has not gone according to plan.

While doing yard work this morning, for the first time in my life, I tried to weed eat my leg. Three times.

Then, I noticed one of the dogs had foam coming from his mouth just as I saw the toad not far from us, and neither were happy. I thought the toad was a goner, but after I got the dog inside to google whether or not he was going to die, he hopped off. The first article I found online went on and on and on and on about the difference between frogs and toads, and how some toads are poisonous, blah blah blah... I mean, the dog could've died while I tried to get to the information I needed!

The dog didn't die. But I did spend the rest of my time weed eating deciding what I would do if he exhibited any of the signs of toxicity. I mean, he has dementia...and he HAS had a pretty good life. Did I need to spend hundreds of dollars on him if he's about to check out anyway? 

I decided I should clean out my car. That's when I knew the universe had gone awry. I'm that person that NEVER (and I mean NEVER in my life!) leaves the vehicle without taking the keys with me. ESPECIALLY when I'm at the car wash, I make sure my keys are in my pocket, because I just *know* somehow the car is going to lock and the keys will be locked inside. I washed the car with no issue. Then, while I was vacuuming it out with the worst suction vacuum EVER, I thought about how I should have just gotten out my shop vac at home, because it works SO much better but I just didn't want to drag it out of the basement, and I might as well start vacuuming behind the driver seat even though it's pointless I wonder what I'm going to have for lunch because I'm hungry and THEN IT HAPPENED.

 The back door was locked. I didn't panic yet, because it usually does lock, and I had driven from the car wash to the vacuum, so that made sense. Then I tried the front door and it had locked somehow. My fear was finally justified. I KNEW it could do this! I looked down and saw the keys in my seat.

My first thought was that my daughter probably has the spare key on her key ring. In Croatia. I can't call her housemate to see if she left her keys at home because my phone is locked in the car. Thankfully my sister has had the same phone number for over 20 years, so I can call her, and she is at my house a few minutes away. There is a lot more that goes wrong, but the story is already getting too long...eventually she gets there and calls AAA.


I think it was his first day. He can't get the door open. I so badly wanted to take the tools from him and do it myself, because sometimes it's just common sense (and we know how that is). Finally I realize how easily my keys would be to grab with his glorified coat hanger thingy, and tell him that might be easier. It takes him a while, but finally...SUCCESS. Let me tell you something... if you have a bunch of big jingly things on your keys, get them off now. Here are my keys, and they barely fit through the crack in the door. If I had all kinds of stuff on there, I'd probably still be sitting at the car wash trying to figure out what to do with his body. PLEASE tell your teenage girls that think it's all cute to have ginormous key decor that it isn't! 

As soon as I got in my car, I looked for my phone so I could contact my daughter's housemate to see if her keys are there. That's when I discovered I had left my phone at home...

I have decided that I need adult supervision. I don't know what awaits me tomorrow, but I'm pretty sure I can't handle it. I have decided to put myself up for adoption. If you can find it in your heart to adopt a crazy old lady that is a danger to herself and probably her pets, PLEASE... you know where to find me. I'm probably going to have to start drinking, so I'll come with alcohol (doesn't mean I'll share, don't get crazy now).

Saturday, June 24, 2023

Wedding Dress Update by Vanya Designs

Linen dress
 My daughter bought this simple linen dress originally to get married in, and as it got closer to her wedding date, she started reconsidering her decision. She REALLY wanted a "real" wedding dress and she knew what style she wanted, but couldn't find it anywhere.

She had already tried on my wedding dress from 24 years ago, and it fit perfectly. And while it was NOT the style she was looking for, her creative mind saw more in it and had hidden the idea back in her mind that it might be converted to the dress she had envisioned. 

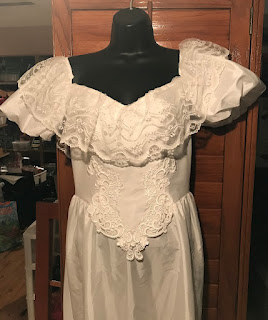
So many weeks later, when we were almost out of time, she pulled the idea back out after we looked for some dresses that she might be happier with and our shopping trip fell flat. She tried my dress on again, and it really did look like we might be able to turn it into the dress of her dreams. Here is what we had to work with...
 

JC Penney Wedding Dress 1999
This is me in 1999

JC Penney Vintage Wedding Dress
This is the dress 24 years later

Near Atlanta where I grew up, we had "JC Penney Outlet" and they had racks and racks of wedding dresses. That's where this dress came from. But I didn't buy it there. When I was 17, my mom found it at a garage sale for $50 and had me come try it on! It fit perfectly, and I had no idea when I would ever marry, but it was worth the purchase at that price. (I didn't get married until TEN years later!) This dress was made in the USA.

After we thought we might be able to make it work, Anna went out for the night, so while she was gone, I started chopping away at the dress. I was terrified. What if I ruined it?! Then I realized I didn't really care, and it was only $50! So this is how far I got before she came home and tried it on.

Vintage Wedding Dress Makeover

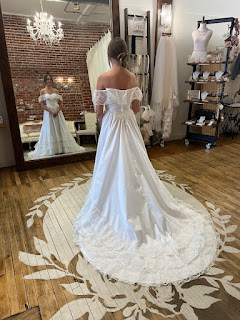
I think the pictures we took of the initial try on must be on her phone. But she said YESSSS. We tried to tuck the sleeve under to see if she would want the sleeve to stay on, or just have the lace, and it was a really hard decision. What wasn't a hard decision was where to get it finished. I can sew (kind of) but I was not about to try and finish this myself. So Anna called Vanya Designs and set up an appointment. Libbi helped us decide to lop off the sleeves. We also needed to add a slip, a new shorter zipper in the back, boning on the front (and later on the back), elastic to the lace over the arms, and a few other details that helped bring it all together. This is the first fitting after initial alterations, and it is not quite finished here, but it is my favorite picture showing the transition the dress has made. 

Vintage Wedding Dress Makeover

In the end, she was soooooooo glad we did this. You only get married once (well, she is!) and I'm glad we could make her wedding day dream come true. One of the interesting things about Anna is that as a little girl growing up with lots of time after she got her school work done, she used to take items from the trash and turn them into various items for her American Girl dolls! She blew me away with all the little things she made. It's interesting that she took this concept and used it as an adult and took something that seemed useless sitting in a Rubbermaid container and turned it into something useful again. And isn't she beautiful?!

Because you made it to the end, here is a candid shot I took during the wedding. They were kind of far away, so it's a little distorted, but you can still see their joy and beauty as they walk towards the front to get married. More on the wedding when the professional photographs are released...


Wednesday, June 14, 2023

Red Food Dye WARNING

 If you spend much time at home with a child who reacts to Red #40, you may have figured out on your own that something is amiss. That happened to me when my kids were 3 and 4. We had just moved across the country, and they were drinking a lot of Gatorade and snacking on junk, probably skittles. They were out of control. Their behavior is irrelevant, all you need to know is that when we went back to real foods, I got my sweet kids back. It was like night and day. It is criminal that Red #40 hasn't been banned like in other countries, and well, all the other artificial colors, too! Look for it in ingredients and AVOID! ALDI stores have committed to avoiding artificial colors. It's ridiculous how many foods (and meds!) have artificial colors in them. I buy a specific pickle, "Simply Pickles" from Mt. Olive because it doesn't contain Yellow #5. Check those pickle labels!


For more info, and a great website, visit Amen Clinics.

Thursday, June 8, 2023

Refurbishing a Dresser - Again - Using Fabric Decopauge

See that girl ^^up there^^? When she was still in the womb, I refinished this dresser for her nursery. She is 20. So I decided it is time for a makeover. She is getting married in a couple of weeks, and has already re-furbished two dressers for herself, so this one is going to be mine now.


I had purchased it at a garage sale probably, for around $20. All the paints were "oops" paints I had collected over time from Home Depot. The knobs were on clearance at Target, and the decals came from a wallpaper border that was on clearance ( I think it was one of those 4' wallpaper borders that might not exist anymore). I used Mod Podge to attach the decals, and probably sealed the whole dresser with it because the paints may have had different sheens- I can't really remember.

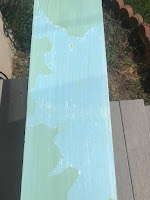
To remove the decals, I heated them up with an iron under parchment paper. That helped a little bit, but where the bottom part of the paper stayed attached in some areas, I used water to wet it and then scraped with a plastic scraper. I took this picture to show people what Mod Podge does over time. Most people know it "yellows," and now you can see to what extent. 

Drawer before sanding
To remove the paint, I first sanded. Then after my sister said, "Why don't you just use paint remover?" and the sanding got to be very tedious, I decided to try the paint remover we already had. Neither technique was fun and both required a certain amount of elbow grease and patience. There was a layer of paint as well as primer underneath what I painted, and now I see the benefit of removing the paint before adding on! 

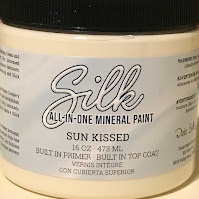
I didn't get a picture of the dresser all sanded and ready to paint. I think I was too exhausted, and excited to get a coat of paint on it! I chose Dixie Belle Silk All-In-One Mineral Paint in the color Sun Kissed which I purchased locally from Generations in Wichita, KS. I had never used Dixie Belle before, but I chose the color because I already had knobs that I had gotten on clearance at Hobby Lobby.

Sun Kissed by Dixie Belle

I was worried that I would need more paint because it went on so thick, but because it went on so thick, I only needed two full coats and then some spot checking on areas I didn't paint heavy enough. It only took HALF the container to paint the whole thing!

It's painted, but the best part is coming...I'm going to use fabric to decoupage this part!

I taped off the part around where I decoupaged to keep that area clean and to be able to remove the fabric that got stuck to it rather than trying to scrape it off my new paint. I did a quick search on which medium I should use for this product, and thanks to Deidre at Our Upcycled Life, I think I chose the right medium. I used "Semi-Gloss" because it's what I already had, but want to mention that the dresser is matte and the fabric with semi-gloss polycrylic had a similar sheen to the matte paint.

The fabric I chose is a Pioneer Woman print. I only used a small portion of the pre-cut fabric, so I can use the rest to make or decoupage other things in the future. I matched this fabric to the knobs, but I couldn't believe how well the dresser matched. I was really looking for an off-white paint, but actually ended up liking the pale yellow color it turned out to be.

While the polycrylic dried, I started removing the tags from the knobs. And I also needed to change out the contact paper. Here is the old and new. I forgot to clean out one of the drawers before adding the contact paper and it didn't stick. So I had a little waste, but I'm glad I only paid $1.99 for the roll at Goodwill!


Are you ready to see the final product?! BUT WAIT! There's more... I had to make some repairs on the drawers while I was working on the dresser, and I figured out why. So I added these quarter-round PVC pieces from Home Depot to give the drawers a little more support and to make it easier for the drawers to slide. I attached these with caulk. I had seen a video previously where people used it on trim on their house, and I had to use it in some places in my bathroom and saw how well they held, so I figured, why not? This actually worked great, and the drawers slid much easier.

But I also used some of this on the middle brace where it was still wood on wood. 

Helps Wood Drawer Slide

If you can't find it locally, you can find it at Amazon

And now.... the finished product! What do you think? 


I forgot about the wheels! The original wheels were long gone. The dresser had been moved to 5 different houses in 20 years, and across the country. It happens! But I like these better. 

If you think THIS is a transformation, I can't wait to show you how this dress from my wedding 24 years ago shows up at my daughter's wedding